首页
关于
Search
1
AdGuardHome 安装及部署教程
49,068 阅读
2
Oracle开放全部端口并关闭防火墙
13,189 阅读
3
关于微软Azure学生白嫖指南
12,783 阅读
4
搭建基于telegram的无限网盘
12,058 阅读
5
最新Cloudflare免费自选IP教程(非Partner)
10,546 阅读
默认分类
技术搬砖
教学设计
故事奇谈
生活琐事
错题分析
精品软件
登录
找到
2
篇与
onedrive
相关的结果
2022-10-11
qBittorrent自动上传种子资源到onedrive或GoogleDrive教程
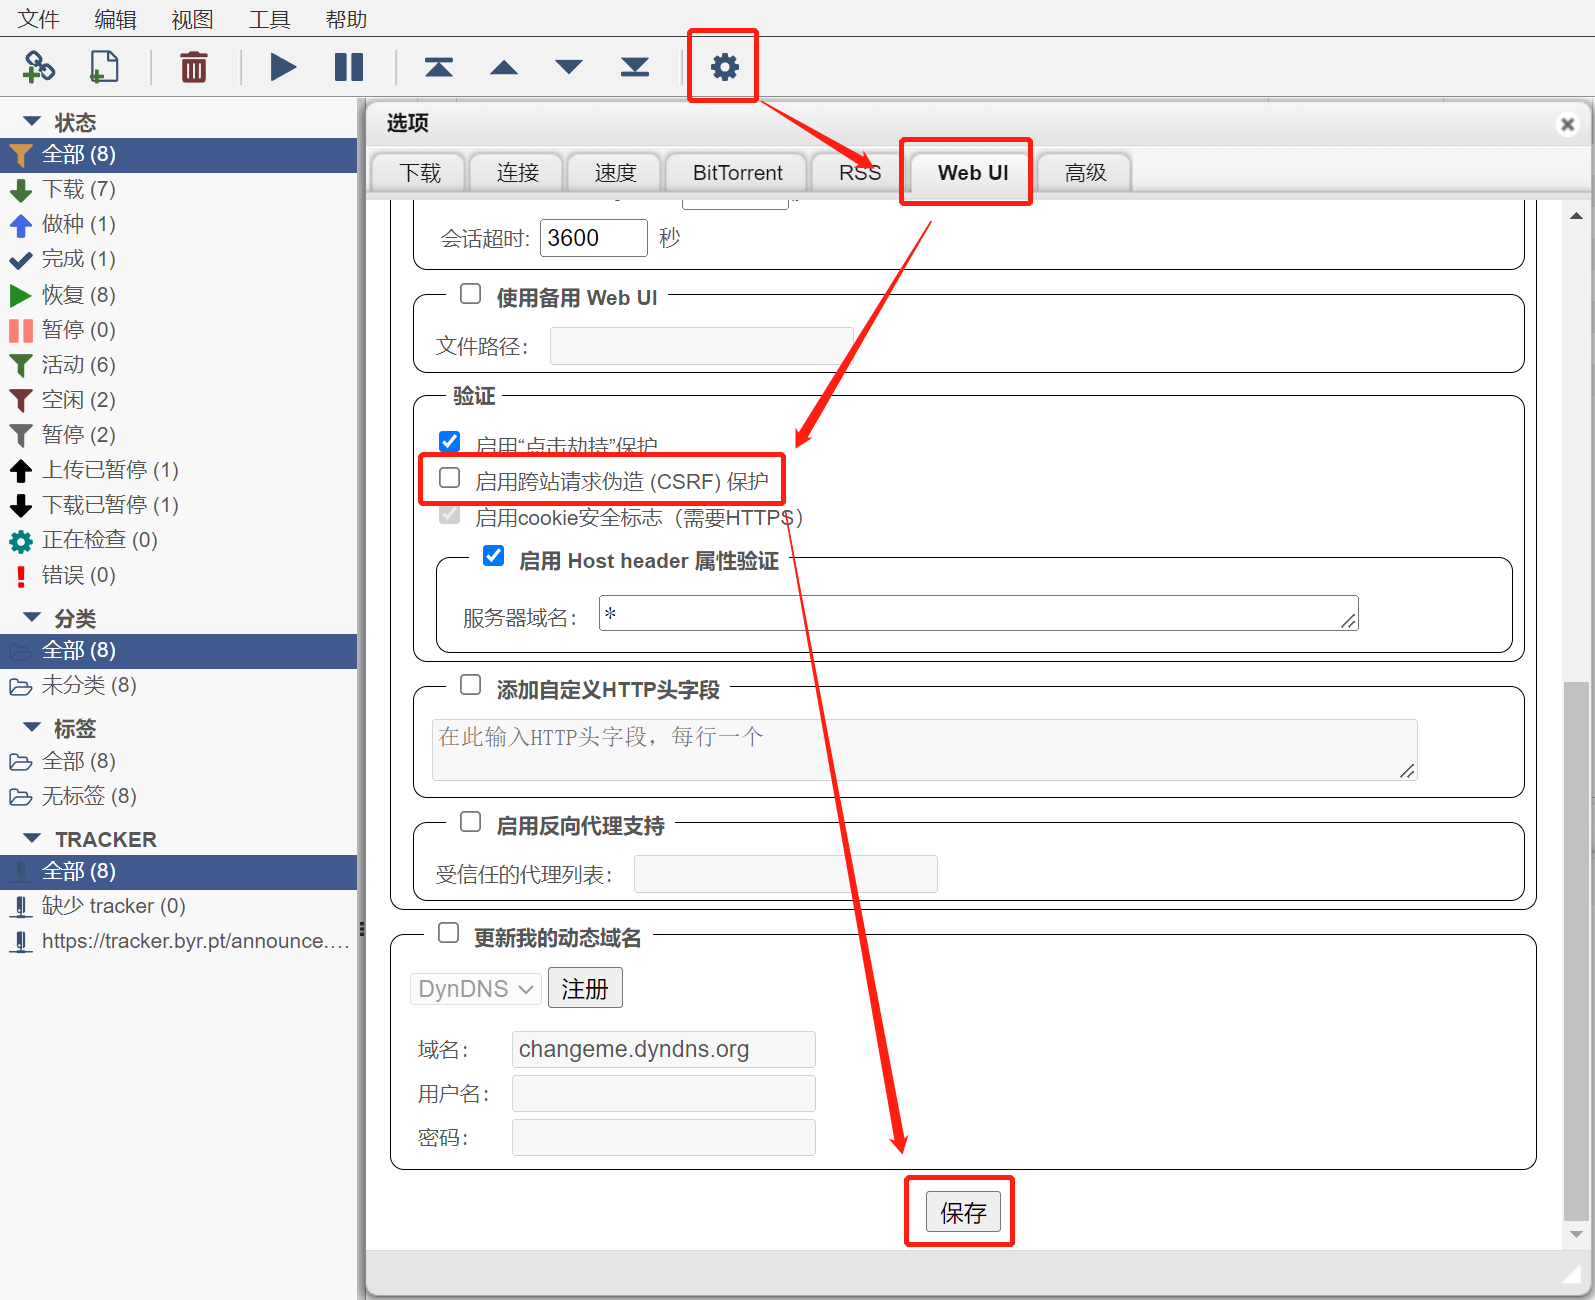
基础准备 已安装好rclone和挂载好onedrive或GoogleDrive docker安装qbittorrent docker安装qbittorrent 1、拉取镜像 docker pull linuxserver/qbittorrent:version-4.6.0-r02、建立容器 docker run -d \ --name=qbittorrent \ -e PUID=1000 \ -e PGID=1000 \ -e TZ=Etc/UTC \ -e WEBUI_PORT=8080 \ -p 9821:9821 \ -p 9821:9821/udp \ -p 8080:8080 \ -v $PWD/qbittorrent/config:/config \ -v <宿主机目录>:/downloads \ --restart unless-stopped \ linuxserver/qbittorrent:version-4.6.0-r03、访问WEBUI返回 Unauthorized 配置文件缺少参数 # qBittorrent.conf WebUI\HostHeaderValidation=false# 进入容器 docker exec -it qbittorrent bash # 一行命令 echo 'WebUI\HostHeaderValidation=false' >>config/qBittorrent/qBittorrent.conf需要特别注意的是:如果使用Nginx反向代理的话,需要先在局域网能直接访问的情况下,先按如下进行配置 图片 手动安装qbittorrent4.3.9 cd /root wget https://github.com/userdocs/qbittorrent-nox-static/releases/download/release-4.3.9_v1.2.15/x86_64-qbittorrent-nox chmod +x x86_64-qbittorrent-nox ./x86_64-qbittorrent-nox输入y 然后ctrl+c退出就行 cat << "EOF" > /etc/systemd/system/qbittorrent.service [Unit] Description=qBittorrent Daemon Service After=network.target [Service] LimitNOFILE=512000 User=root ExecStart=/root/x86_64-qbittorrent-nox [Install] WantedBy=multi-user.target EOF# 更新配置 systemctl daemon-reload # 启动服务 systemctl start qbittorrent # 查看状态 systemctl status qbittorrent如需重启/关闭程序 请使用kill命令关闭程序 ps -aux | grep qbittorrent kill 对应序号 如 kill 11111 再使用进程守护打开即可使用 安装依赖 apt-get install -y jq yum install -y jq下载并配置脚本文件 qb自动上传脚本文件:密码-9i96 下载好之后放到/home/你的路径/qb_auto_rclone.sh 随后打开根据注释编辑好脚本。任何方式编辑修改即可。 主要修改以下内容部分。 qb_version="4.3.9" # 改:改为你的实际qb的版本号 qb_username="你的用户名" # 改:该为你的qb登录用户名 qb_password="你的密码" # 改:改为你qb登录的密码 qb_web_url="http://127.0.0.1:8080" # 查:改为qb的登录地址 log_dir="/home/qbauto" # 改:改为你日志运行的路径 rclone_dest="od1:" # 运行rclone config查看name字段即可;格式就是"XX:" from_dc_tag="/vvv" # 改:上传后的相对根目录,可为空 rclone_parallel="32" # rclone上传线程 默认4修改配置文件图片 注1:放到哪不重要,直接放自己/home以下的任意文件夹即可,后面运行脚本根据自己路径运行即可。 注2:如果过程中出现了你的奇怪操作未上传完就重启电脑或者kill rclone,可能脚本会挂掉什么的,此时需要删除同目录下的一个.lock文件 qbittorrent创建一个tag 创建标签命名为【待上传云端】这一步必不可少。 有了这个标签,脚本自动运行起来了才会自动上传。 注:其他标签后面会自动生成。只需要创建【待上传云端】即可。 创建一个tag图片 使用方法 1、手动对某个种子进行特殊标记。 手动对某个种子进行特殊标记图片 2、标记过后不用管它 脚本定时执行,会在执行时将其设置为上传中。上传结束后会保持在结束的标签中 enter description here图片 都准备好了运行即可,注意需正确填写你所存放的路径。 随后终端运行如下命令即可输出相关回应 bash /home/你的路径/qb_auto_rclone.sh3、去/home/qbauto文件夹下打开qbauto_copy.log文件即可查看日志上传进度等情况。 enter description here图片 注:假如出现未知类型,取消上传的结果,说明你的路径不对或者你的qBittorrent是安装在docker里的。 enter description here图片 解决办法: 根路径目录和docker容器映射目录设置为一致即可。 例:根路径/home/movie→docker内部/home/movie 自动化运行 创建和编辑cron作业的命令是相同而且很简单。而且更酷的是,你无需在创建新文件或编辑现有文件后重新启动cron。 键入crontab -e 粘贴以下命令,以下是计划任务,定时1分钟一次执行该sh文件 */1 * * * * bash /home/你的路径/qb_auto_rclone.sh(root权限下) crontab启动:/etc/init.d/cron start 或( service cron start ) crontab重启: /etc/init.d/cron restart 或(service cron restart ) crontab关闭: /etc/init.d/cron stop 或( service cron stop ) 在终端中,可以利用ps -aux|grep cron查询crontab状态,默认情况下,是自启动的
技术搬砖
# qBittorrent
# onedrive
admin
4年前
0
2,613
1
2021-06-15
Windows平台下使用 Rclone 挂载 OneDrive 为本地硬盘
Rclone (rsync for cloud storage) 是一个命令行程序,用于同步文件和目录,支持常见的 Amazon Drive 、Google Drive 、OneDrive 、Dropbox 等云存储。本文将演示在 Windows 平台下将 OneDrive 挂载为本地硬盘,并使用跨平台的 Rclone GUI 连接到云盘。一、环境安装 1、rclone下载 官网下载:https://rclone.org/downloads/ enter description here图片 Github下载:https://github.com/rclone/rclone/releases enter description here图片 下载后解压到一个英文路径中 enter description here图片 2、安装winfsp 官网下载:http://www.secfs.net/winfsp/rel/ enter description here图片 Github下载:https://github.com/billziss-gh/winfsp/releases enter description here图片 下载完毕后安装 01图片 02图片 03图片 3、安装Git 官网地址:https://git-scm.com/downloads enter description here图片 第一步:点击上图中表示的地方进行下载,得到Git-2.17.1.2-64-bit.exe文件。如果你的系统是32位的,可以通过如下方式下载: enter description here图片 第二步:双击下载好的git安装包,弹出提示框,如下图: enter description here图片 第三步:直接点击“Next”进入下一步,选择安装路径,如下图: enter description here图片 第四步:选择好安装路径后,点击“Next”进入下一步,弹出安装配置窗口,包括git命令行、git图形窗口等,如下图所示: enter description here图片 第五步:按照上述默认配置,直接点击“Next”进入下一步,弹出“选择开始菜单文件夹”的窗口,如下图所示 enter description here图片 第六步:按照默认路径即可,直接点击“Next”,进入下一步,进入“选择Git使用的默认编辑器”窗口,如下图所示: enter description here图片 第七步:点击“Next”,进入下一步,进入“调整Path环境变量”窗口,如下图所示: enter description here图片 第八步:选第二项,然后点击“Next”进入下一步,选择HTTPS传输后端,如下图所示: enter description here图片 第九步:选择"Use the OpenSSL library",点击“Next”进入下一步,配置行结束符,如下图所示: enter description here图片 第十步:选择第一项,点击“Next”进入下一步,配置终端模拟器,如下图所示: enter description here图片 第十一步:选择第一项,直接点击“Next”进入下一步,配置额外选项,如下图所示: enter description here图片 第十二步:使用默认配置,直接点击“Install”开始安装,如下图所示: enter description here图片 第十三步:安装完成 enter description here图片 4、为rclone配置环境变量 (1)在电脑桌面右键点击“此电脑”的“属性”选项 (2)选择“高级系统设置”选项 (3)在系统变量中找到path,添加刚才解压后的路径 图片 图片 图片 enter description here图片 (4)检查rclone是否配置成功 按win+X,然后按A 打开 powershell ,当然也可以去打开 cmd ,输入rclone --version,如果出现下面的输出则安装成功,否则检查上面步骤的环境变量是否配置正确。 enter description here图片 二、配置挂载 1、rclone配置 C:\Users\Administrator>rclone config No remotes found - make a new one n) New remote s) Set configuration password q) Quit config n/s/q> n *//第一步:新建配置* name> e5 Type of storage to configure. Enter a string value. Press Enter for the default (""). Choose a number from below, or type in your own value 1 / 1Fichier \ "fichier" 2 / Alias for an existing remote \ "alias" 3 / Amazon Drive \ "amazon cloud drive" 4 / Amazon S3 Compliant Storage Providers including AWS, Alibaba, Ceph, Digital Ocean, Dreamhost, IBM COS, Minio, and Tencent COS \ "s3" 5 / Backblaze B2 \ "b2" 6 / Box \ "box" 7 / Cache a remote \ "cache" 8 / Citrix Sharefile \ "sharefile" 9 / Compress a remote \ "compress" 10 / Dropbox \ "dropbox" 11 / Encrypt/Decrypt a remote \ "crypt" 12 / Enterprise File Fabric \ "filefabric" 13 / FTP Connection \ "ftp" 14 / Google Cloud Storage (this is not Google Drive) \ "google cloud storage" 15 / Google Drive \ "drive" 16 / Google Photos \ "google photos" 17 / Hadoop distributed file system \ "hdfs" 18 / Hubic \ "hubic" 19 / In memory object storage system. \ "memory" 20 / Jottacloud \ "jottacloud" 21 / Koofr \ "koofr" 22 / Local Disk \ "local" 23 / Mail.ru Cloud \ "mailru" 24 / Mega \ "mega" 25 / Microsoft Azure Blob Storage \ "azureblob" 26 / Microsoft OneDrive \ "onedrive" 27 / OpenDrive \ "opendrive" 28 / OpenStack Swift (Rackspace Cloud Files, Memset Memstore, OVH) \ "swift" 29 / Pcloud \ "pcloud" 30 / Put.io \ "putio" 31 / QingCloud Object Storage \ "qingstor" 32 / SSH/SFTP Connection \ "sftp" 33 / Sugarsync \ "sugarsync" 34 / Tardigrade Decentralized Cloud Storage \ "tardigrade" 35 / Transparently chunk/split large files \ "chunker" 36 / Union merges the contents of several upstream fs \ "union" 37 / Webdav \ "webdav" 38 / Yandex Disk \ "yandex" 39 / Zoho \ "zoho" 40 / http Connection \ "http" 41 / premiumize.me \ "premiumizeme" 42 / seafile \ "seafile" Storage> 26 *//第二步:选择26 Microsoft OneDrive* ** See help for onedrive backend at: https://rclone.org/onedrive/ ** OAuth Client Id Leave blank normally. Enter a string value. Press Enter for the default (""). client_id> OAuth Client Secret Leave blank normally. Enter a string value. Press Enter for the default (""). client_secret> Choose national cloud region for OneDrive. Enter a string value. Press Enter for the default ("global"). Choose a number from below, or type in your own value 1 / Microsoft Cloud Global \ "global" 2 / Microsoft Cloud for US Government \ "us" 3 / Microsoft Cloud Germany \ "de" 4 / Azure and Office 365 operated by 21Vianet in China \ "cn" region> 1 *//第三步:选择1 国际版* Edit advanced config? (y/n) y) Yes n) No (default) y/n> n *//第四步:选择n 不进行高级设置* Remote config Use auto config? * Say Y if not sure * Say N if you are working on a remote or headless machine y) Yes (default) n) No y/n> y *//第五步:输入y 使用自动配置授权* *//输入y后会打开默认浏览器 登录Microsoft账号后 选择 是 即可* If your browser doesn't open automatically go to the following link: http://127.0.0.1:53682/auth?state=bWBcEsbfRHRZIgcZY7Fg_w Log in and authorize rclone for access Waiting for code... Got code Choose a number from below, or type in an existing value 1 / OneDrive Personal or Business \ "onedrive" 2 / Root Sharepoint site \ "sharepoint" 3 / Sharepoint site name or URL (e.g. mysite or https://contoso.sharepoint.com/sites/mysite) \ "url" 4 / Search for a Sharepoint site \ "search" 5 / Type in driveID (advanced) \ "driveid" 6 / Type in SiteID (advanced) \ "siteid" 7 / Sharepoint server-relative path (advanced, e.g. /teams/hr) \ "path" Your choice> 1 *//第六步:选择1 onedrive* Found 1 drives, please select the one you want to use: 0: OneDrive (business) id=****************** Chose drive to use:> *0 //第七步:选择0: 账号ID* Found drive 'root' of type 'business', URL: ******************* Is that okay? y) Yes (default) n) No y/n> y *//第八步:选择y 获取账号root权限* -------------------- [e5] type = onedrive region = global token = ******* drive_id = ********* drive_type = business -------------------- y) Yes this is OK (default) e) Edit this remote d) Delete this remote y/e/d> y *//第九步:选择y 确认配置* Current remotes: Name Type ==== ==== e5 onedrive e) Edit existing remote n) New remote d) Delete remote r) Rename remote c) Copy remote s) Set configuration password q) Quit config e/n/d/r/c/s/q> q *//第十步:选择q 退出* C:\Users\Administrator>在 C:\Users\你的用户名\.config\rclone文件夹下就可以看见配置文件 rclone.conf 啦。 enter description here图片 2、挂载OneDrive为本地硬盘 此时请使用 git bash 的终端执行以下命令,因为我使用cmd 和 powershell 都出现关闭终端后挂载程序退出、本地挂载的OneDrive退出的现象。 如果你的windows没有安装git , 请自行安装。若你使用 cmd 的话 ,cmd 是不能退出的,要保持 cmd 不退出本地硬盘才一直挂载着。 在 git bash 中输入以下挂载命令: rclone mount OneDrive_local:/ Q: --cache-dir E:\OneDrive --vfs-cache-mode writes &其中: OneDrive_loca 替换为你自己前面设置的名称 。 Q: 替换为你想要挂载后硬盘的盘符名称即可,记得不要和本地的C盘、D盘等重复。 E:\OneDrive 为本地缓存目录,可自行设置 。 出现:The service rclone has been started 则说明挂载成功。 然后输入 exit 退出终端即可。 然后就可以看见本地多了一个盘,往里面复制文件就是上传,从里面复制文件到其它盘就是下载。 3、设置开机自启动挂载 创建一个名称为 startup_rclone.bat 的文件,里面填写上面的挂载命令: rclone mount OneDrive_local:/ Q: --cache-dir E:\OneDrive --vfs-cache-mode writes &将这个文件放在C:\Users\用户名\AppData\Roaming\Microsoft\Windows\Start Menu\Programs\Startup 中 重启计算机后就会自动挂设置的云盘了,当然这样做由于调用的是 cmd 因此还是不能关闭运行的 cmd。下面介绍一种利用 Rclone GUI 的进行管理的使用方法。 三、可视化上传下载 RcloneBrowser Github下载地址:https://github.com/kapitainsky/RcloneBrowser/releases enter description here图片 下载好后进行安装,然后进行配置。配置 rclone.exe的路径还有 rclone.conf 配置文件的路径。 enter description here图片 enter description here图片 enter description here图片 enter description here图片 enter description here图片 enter description here图片 enter description here图片 在 Jobs当中还可以查看任务的进度、速度等。 enter description here图片 另外还可以设置代理,见下图: enter description here图片
技术搬砖
# rclone
# onedrive
# windows
admin
5年前
0
9,132
2